Ich wollte wissen wie es mit PowerShell möglich ist die Bluesky APIs für neue Posts (oder Skeets) zu nutzen. Für Posten per Code hat Bluesky ein Beispiel publiziert, ausserdem eine sehr gute Dokumentation über ihre API.
Ich nutze die API seit Februar mit meinem optimiertem AI Blog Assistant.
Am Beispiel, der Post wurde über die API publiziert. Zu beachten ist, Bluesky signalisiert heute nicht, wenn ein Post über die API (oder von einem Bot) erstellt wird.
Learn how to use the Bluesky APIs with PowerShell for posting, including how to post in plain-text, website cards, mentions, and links. #Bluesky #PowerShell #Coding
— Tobias Asböck (@tasboeck.bsky.social) April 25, 2025 at 1:12 PM
[image or embed]
In meinem Beitrag fasse ich Informationen über die API und Posten mit PowerShell zusammen.
Beachte, dass ein Bluesky-Post auf 300 Zeichen begrenzt ist. Wenn das Zeichenlimit überschritten wird, gibt die API einen Fehler zurück.
Content
1) Anforderungen
Du benötigst ein Bluesky Konto und einen API-Key. Den Key erstellst du über dein Bluesky Konto unter Settings > Privacy and Security > App Passwords. Erstelle ein neues App Passwort, es wird dir nur einmal angezeigt.
2) Authentifizierung
Mit dem API-Key führst du eine Authentifizierung über createSession durch und bekommst einen JWT-Token zurück. Dieser Token ist für zwei Stunden gültig. Du kannst ihn später verlängern oder einen neuen Token beziehen.
$BSkyAuthKey = "<ReceiveYourBSkyAppPasswordFromASecurePlace>"
$BSkyAccount = "tasboeck.bsky.social" # Replace it with your Bluesky account name

$Body = @"
{
    "identifier": "$BSkyAccount",
    "password": "$BSkyAuthKey"
}
"@

# Get the authentication token
$BSkyAuthResponse = Invoke-RestMethod -Uri "https://bsky.social/xrpc/com.atproto.server.createSession" -Method Post -Body $Body -ContentType "application/json"

# Build the authentication header
$AuthHeader = @{
    "Authorization" = "Bearer $($BSkyAuthResponse.accessJwt)"
    "Content-Type"  = "application/json"
}
3) Posten von Plain-text
Zur Erstellung von neuen Posts nutzt du die API createRecord.
Beim Posten von „Plain-text“ sind drei Parameter erforderlich.
- repo, Name von deinem Bluesky Konto
- collection, vordefiniert > app.bsky.feed.post
- Record, inkludiert deinen Plain-Text.
Optionale Parameter:
- createdAt, für die Angabe wann es gepostet wurde. Bluesky schränkt nicht ein in der Vergangenheit zu posten, sie fügen in dem Post aber einen Hinweis hinzu wann Bluesky den Post das erste Mal gesehen hat.
- langs, informiert Bluesky in welcher/n Sprache(n) der Post publiziert wird. Es sind keine mehrsprachigen Posts.
- und weitere, abhängig von deinem Post.
# Prepare the body with the post content for a simple plain text post
$PostBody = @{
    repo = "$BSkyAccount"
    collection = "app.bsky.feed.post"
    record = @{
        text = "Hello world, this is just a demo post"
        createdAt = (Get-Date).ToString("o")
        langs = @("en-US")
    }
} | ConvertTo-Json -Depth 10

# Send the POST request to Bluesky
$APIUrl = "https://bsky.social/xrpc/com.atproto.repo.createRecord"
$BSkyResponse = Invoke-RestMethod -Uri $APIUrl -Method Post -Headers $AuthHeader -Body $TextBody
Die API gibt als Antwort die ID des Posts zurück. Aus der ID und dem Bluesky Konto kannst du die Post-URL zusammenstellen.
$BSkyPostUrl = $BSkyResponse.uri
$BSkyPostUrl = $BSkyPostUrl.Substring($BSkyPostUrl.LastIndexOf("/") + 1)
$BSkyPostUrl = "https://bsky.app/profile/$BSkyAccount/post/$BSkyPostUrl"
$BSkyPostUrl
Bluesky wird bei einem Plain-text Post eine URL nicht konvertieren. Leser können die URL nicht anklicken. Hashtags werden als Text erfasst und müssen im Post extra definiert werden, siehe mein Beispiel für Webseiten Karten.
4) Posten von Webseiten Karte
In meinem Beispiel publizierte ich den Post als Webseiten Karte (Website card embeds).
If you use the #Microsoft365 Roadmap API in your automation, you must update the URL by 15 March. Fetch updates easily with #PowerShell.
— Tobias Asböck (@tasboeck.bsky.social) February 17, 2025 at 3:04 PM
[image or embed]
Damit die Karte in der Art aussieht müssen im PostBody verschiedene Parameter vordefiniert sein.
- Text für den Post
- Hashtags für den Text (optional, wenn du welche nutzt)
- Bild für die Karte
- Titel, URL und Beschreibung für die Karte
Text
Beim Text gibt es keinen Unterschied zum ersten Beispiel.
$BkyPostText = "Hello world, this is just a demo post with #PowerShell and #Hashtags"

$PostBody = @{
    repo = $BSkyAccount
    collection = "app.bsky.feed.post"
    record = @{
        text = $BkyPostText
        createdAt = (Get-Date).ToString("o")
        langs = @("en-US")
    }
} | ConvertTo-Json -Depth 10
Hashtags
Für Hashtags muss der API mitgegeben werden welcher Hashtag bei welchem Zeichen beginnt und bei welchem endet. Bluesky beschreibt es als Rich text facets.
Ich erstellte mir dafür einen Codeblock um den Text auszuwerten und als Facets zu erfassen. So ist es unabhängig wie viele Hashtags an welcher Position im Text vorhanden sind.
$BkyPostText = "Hello world, this is just a demo post with #PowerShell and #Hashtags"

# Create an array to hold the facets
$BSkyHashtags = @()

# Regular expression to match hashtags
$regex = '#\w+'

# Find all hashtags in the string
$HashtagMatches = [regex]::Matches($BkyPostText, $regex)

# Loop through hashtag matches to create facets with start and end indices
foreach ($Match in $HashtagMatches) {
    $byteStart = $BkyPostText.IndexOf($Match.Value)
    $byteEnd = $byteStart + $Match.Length
    $BSkyHashtags += [PSCustomObject]@{
        index = @{
            byteStart = $byteStart
            byteEnd   = $byteEnd
        }
        features = @(
            [PSCustomObject]@{
                '$type' = 'app.bsky.richtext.facet#tag'
                tag     = $Match.Value.TrimStart('#')  # Remove the '#' symbol from the tag
            }
        )
    }
}
Es hat die Start- und Endposition und den Begriff erfasst.

Die Facets füge ich dem PostBody hinzu. Damit kann die API erkennen welche Hashtags an welcher Position sind.
$PostBody = @{
    repo = "tasboeck.bsky.social"
    collection = "app.bsky.feed.post"
    record = @{
        text = $BlogPostItem.SocialMediaText
        createdAt = (Get-Date).ToString("o") # $PostPublishDate
        langs = @("en-US")
        facets = $BSkyHashtags
    }
} | ConvertTo-Json -Depth 10
Bild
Für das Bild möchte Bluesky die ID von einem Blob-File.
Du musst das Bild über die API uploadBlob zu Bluesky hochladen. Die API gibt dir die Blob ID zurück. Mit der Art cacht Bluesky das Bild, siehe Dokumentation.
Each post contains up to four images, and each image can have its own alt text and aspect ratio. Individual images are limited to 1,000,000 bytes in size. Image files are referenced by posts, but are not actually included in the post (eg, using bytes with base64 encoding). The image files are first uploaded as „blobs“ using com.atproto.repo.uploadBlob, which returns a blob metadata object, which is then embedded in the post record itself.
# Uploading an image to the Bluesky blob storage

$ImagePath = "PathToYourImage.png"
$APIUrl = "https://bsky.social/xrpc/com.atproto.repo.uploadBlob"
$ImageBytes = [System.IO.File]::ReadAllBytes($ImagePath)
$BSkyImageResponse = Invoke-RestMethod -Uri $APIUrl -Method Post -Headers $AuthHeader -Body $ImageBytes -ContentType "application/octet-stream"
Bluesky gibt die Blob ID zurück.

Die ID ergänze ich im PostBody.
$PostBody = @{
    repo = "tasboeck.bsky.social"
    collection = "app.bsky.feed.post"
    record = @{
        text = $BlogPostItem.SocialMediaText
        createdAt = (Get-Date).ToString("o")
        langs = @("en-US")
        facets = $BSkyHashtags
        embed = @{
            '$type' = "app.bsky.embed.external"
            external = @{
                thumb = @{
                    '$type' = "blob"
                    ref = @{
                        '$link' = $BSkyImageResponse.blob.ref.'$link'
                    }
                    mimeType = "image/png"
                    size = $BSkyImageResponse.blob.size
                }
            }
        }

    }
} | ConvertTo-Json -Depth 10
Titel, URL und Beschreibung
Zum Abschluss füge im PostBody noch einen Titel für die Karte, wohin die Karte verlinken soll und eine Beschreibung hinzu.
$PostBody = @{
    repo = "tasboeck.bsky.social"
    collection = "app.bsky.feed.post"
    record = @{
        text = $BkyPostText
        createdAt = (Get-Date).ToString("o")
        langs = @("en-US")
        facets = $BSkyHashtags
        embed = @{
            '$type' = "app.bsky.embed.external"
            external = @{
                uri = "https://blog-en.topedia.com"
                title = "Topedia Blog"
                description = "This is a demo"
                thumb = @{
                    '$type' = "blob"
                    ref = @{
                        '$link' = $BSkyImageResponse.blob.ref.'$link'
                    }
                    mimeType = "image/png"
                    size = $BSkyImageResponse.blob.size
                }
            }
        }

    }
} | ConvertTo-Json -Depth 10
Damit ist der PostBody praktisch fertig und kann über die API gepostet werden.
$BSkyResponse = Invoke-RestMethod -Uri "https://bsky.social/xrpc/com.atproto.repo.createRecord" -Method Post -Headers $AuthHeader -Body $PostBody

# Get the post URL
$BSkyPostUrl = $BSkyResponse.uri
$BSkyPostUrl = $BSkyPostUrl.Substring($BSkyPostUrl.LastIndexOf("/") + 1)
$BSkyPostUrl = "https://bsky.app/profile/$BSkyAccount/post/$BSkyPostUrl"
$BSkyPostUrl
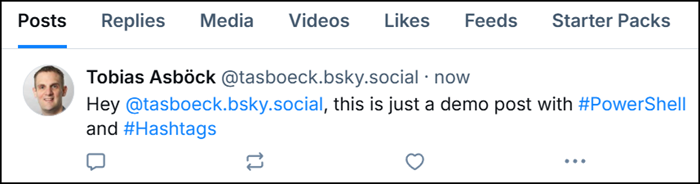
Mein Post wurde als Webseiten Karte publiziert.

5) Posten mit @Erwähnung
Du kannst deinen Post mit einer @Erwähnung ergänzen. Bei Erwähnungen handelt es sich erneut um Facets. Der API gibst du mit an welcher Position es die Erwähnung hinzufügen soll.
Für die Erwähnung benötigt es den Kontonamen und die Bluesky ID (DID) des Empfängers.
Mit der API resolveHandle kannst du die DID von einem Bluesky Konto abfragen. In meinem Beispiel frage ich mich selber ab und erhalte die DID did:plc:3u3hwwaccglh3duhw6wg2tkn zurück.
# Get the DID for a Bluesky account

$BSkyRecipient = "tasboeck.bsky.social"
$BSkyRecipientHandle = "@$BSkyRecipient"
$BSkyRecipientID = Invoke-RestMethod -Uri "https://bsky.social/xrpc/com.atproto.identity.resolveHandle?handle=$BSkyRecipient" -Method Get -Headers $AuthHeader
$BSkyRecipientID = $BSkyRecipientID.did
Danach wird die Facet gebildet. Ähnlich zu Hashtags gibt du bei der Erwähnung an wann das Zeichen startet und wann es endet. In meinem Beispiel kombiniere ich es mit Hashtags.
$BkyPostText = "Hey $BSkyRecipientHandle, this is just a demo post with #PowerShell and #Hashtags"

# Find the position of the mention in the text
$byteStart = $BkyPostText.IndexOf($BSkyRecipientHandle)
$byteEnd = $byteStart + $BSkyRecipientHandle.Length

# Create an array to hold the facets (each containing the type and index range)
$BSkyFacets = @()

# Create the mention facet
$BSkyFacets += [PSCustomObject]@{
    index = @{
        byteStart = $byteStart
        byteEnd   = $byteEnd
    }
    features = @(
        [PSCustomObject]@{
            '$type' = 'app.bsky.richtext.facet#mention'
            did     = $BSkyRecipientID
        }
    )
}

# Regular expression to match hashtags
$regex = '#\w+'

# Find all hashtags in the string
$HashtagMatches = [regex]::Matches($BkyPostText, $regex)

# Loop through matches to add hashtag facets with start and end indices
foreach ($Match in $HashtagMatches) {
    $byteStart = $BkyPostText.IndexOf($Match.Value)
    $byteEnd = $byteStart + $Match.Length
    $BSkyFacets += [PSCustomObject]@{
        index = @{
            byteStart = $byteStart
            byteEnd   = $byteEnd
        }
        features = @(
            [PSCustomObject]@{
                '$type' = 'app.bsky.richtext.facet#tag'
                tag     = $Match.Value.TrimStart('#')  # Remove the '#' symbol from the tag
            }
        )
    }
}
Kombiniert mit Hashtags ist es folgender Block.
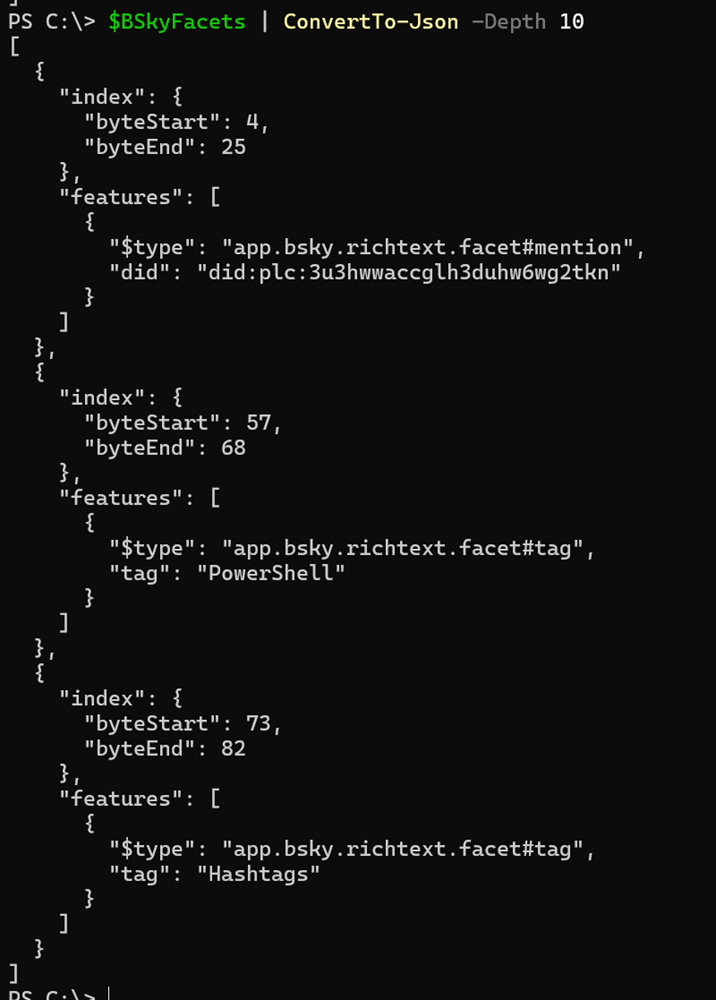
Diesen füge ich wieder in PostBody ein, ohne der Webseiten Karte und poste es
# Posting a Bluesky post with @mention and hashtags

$PostBody = @{
    repo = $BSkyAccount
    collection = "app.bsky.feed.post"
    record = @{
        text = $BkyPostText
        createdAt = (Get-Date).ToString("o")
        langs = @("en-US")
        facets = $BSkyFacets
    }
} | ConvertTo-Json -Depth 10


$BSkyResponse = Invoke-RestMethod -Uri "https://bsky.social/xrpc/com.atproto.repo.createRecord" -Method Post -Headers $AuthHeader -Body $PostBody

$BSkyPostUrl = $BSkyResponse.uri
$BSkyPostUrl = $BSkyPostUrl.Substring($BSkyPostUrl.LastIndexOf("/") + 1)
$BSkyPostUrl = "https://bsky.app/profile/tasboeck.bsky.social/post/$BSkyPostUrl"
Write-Host "BSky Post URL: $BSkyPostUrl"
Der Ergebnis ist wie erwartet.
Erwähnung richtig gesetzt und verlinkt inkl. korrekter Hashtags.
6) Posten mit Link
Wie im 3. Beispiel erwähnt, Bluesky konvertiert bei einem API-Post die URL in keinen klickbaren Text.
Als klickbaren Link musst du (ähnlich zu Hashtags und @mention) erneut eine Facet erstellen. Es ist die dritte von Bluesky beschriebenen Rich Text Facet-Typen.
Wie bei allen Facets gibst du auch bei einem Link die Start- und Endposition an + den Link + den Text, wobei der Text identisch zum Link sein kann.
Als Vergleich, mit HTML ist es ein Format in dieser Art. Mit der Bluesky-API funktioniert es ebenfalls.
<a href="https://blog-en.topedia.com">Topedia Blog</a>
In meinem Beispiel erstelle ich einen Link-Type, ergänze es mit einem Link-Text und welche URL es betrifft.
# Posting a Bluesky post with a link facet
# Prepare the text and link/url
$linkText = "Topedia Blog"
$linkUrl = "https://blog-en.topedia.com"
$BkyPostText = "This is a demo post for Topedia Blog"
$byteStartLink = $BkyPostText.IndexOf($linkText)
$byteEndLink = $byteStartLink + $linkText.Length

# Create an array to hold the facets (each containing the hashtag, mentions and/or link type facets)
$BSkyFacets = @()

# Link facet
$BSkyFacets += [PSCustomObject]@{
    index = @{
        byteStart = $byteStartLink
        byteEnd   = $byteEndLink
    }
    features = @(
        [PSCustomObject]@{
            '$type' = 'app.bsky.richtext.facet#link'
            uri     = $linkUrl
        }
    )
}

# Prepare the post body
$PostBody = @{
    repo = $BSkyAccount
    collection = "app.bsky.feed.post"
    record = @{
        text = $BkyPostText
        createdAt = (Get-Date).ToString("o")
        langs = @("en-US")
        facets = $BSkyFacets
    }
} | ConvertTo-Json -Depth 10


$BSkyResponse = Invoke-RestMethod -Uri "https://bsky.social/xrpc/com.atproto.repo.createRecord" -Method Post -Headers $AuthHeader -Body $PostBody

$BSkyPostUrl = $BSkyResponse.uri
$BSkyPostUrl = $BSkyPostUrl.Substring($BSkyPostUrl.LastIndexOf("/") + 1)
$BSkyPostUrl = "https://bsky.app/profile/tasboeck.bsky.social/post/$BSkyPostUrl"
Write-Host "BSky Post URL: $BSkyPostUrl"
Das Ergebnis ist wie erwartet. Mein Link wurde als klickbarer Text gepostet.